
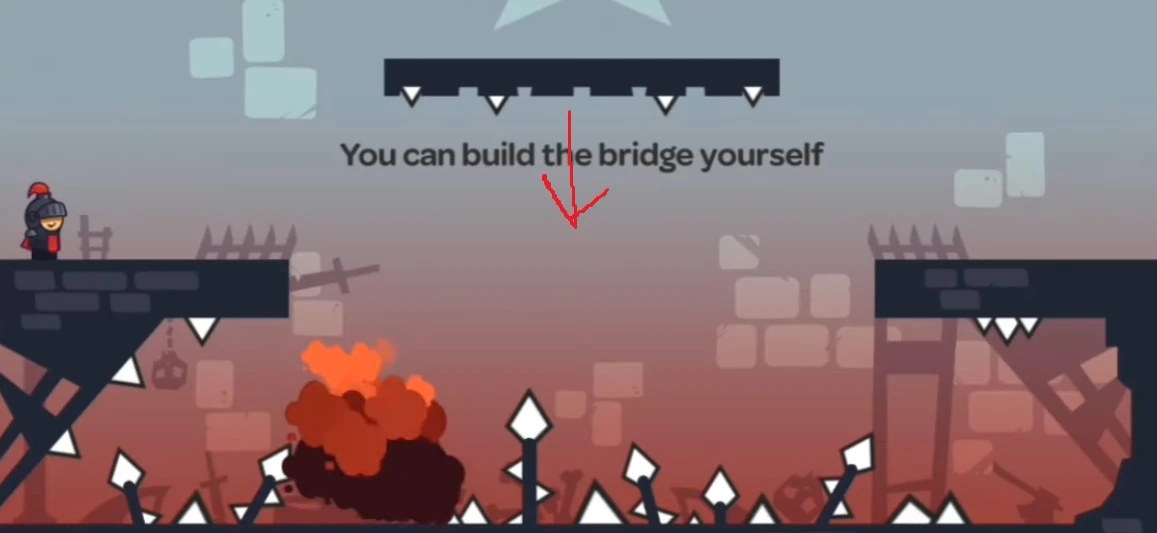
Tricky Castle room numbers can change between Android and iOS releases. Before following this Tricky Castle Level 12 guide, match the gameplay screenshot, room layout and puzzle clue to your version.
Tricky Castle Level 12 walkthroughs & guide
Below is a comprehensive walkthrough for Tricky Castle Level 12, covering the complete route from the opening position to the exit. The main challenge in Tricky Castle Level 12 is learning how to drag the overhead platform down to build a bridge while avoiding the trick built into the room. Follow the steps in order, check the visible response after each action and use the screenshot above to confirm that you are on the same version of the level.
Tricky Castle Level 12 quick answer: Touch the long platform above the spikes and drag it down into the gap, creating a safe bridge that the knight can walk across.
Step 1. Ignore the impossible jump
In Tricky Castle Level 12, stop at the left ledge and inspect the entire room before moving. The spike-filled gap is too wide to clear and the hazards below rule out a normal drop. The clue says that you can build the bridge yourself, directing attention to the long dark platform suspended above the center of the room.
Step 2. Drag the platform into the gap
In Tricky Castle Level 12, place a finger on the overhead platform and pull it downward. This object is controlled directly by touch rather than by the knight. Continue dragging until it sits horizontally between the two safe ledges and covers the route above the spikes. Release it only after both ends form a usable connection.
Step 3. Walk across the new bridge
In Tricky Castle Level 12, return to the movement controls and guide the knight onto the lowered platform. Cross at a steady pace without jumping into the spikes above or below, then step onto the right ledge and enter the exit. If the edge is not reachable, reposition the platform rather than attempting a longer jump.
Notes and Precautions
- 1. The suspended platform can be moved directly with a finger.
- 2. A normal jump cannot safely clear the full spike gap.
- 3. Place the bridge level with both ledges before releasing it.
- 4. The room has no bats, so there is no reason to explore the hazard pit.
Tips and Tricks
- 1. Start the drag near the center of the platform for stable control.
- 2. Move the platform slowly so it remains horizontal.
- 3. Check both bridge ends before switching back to movement controls.
- 4. Walk rather than jump once the bridge is correctly placed.
Tricky Castle Level 12 collectibles and secrets
For Tricky Castle Level 12, there are no bats in this level. Lowering the platform and reaching the right-hand exit completes every required objective. Because the bridge is the only movable object, you can ignore the decorative spikes and background elements once the platform is aligned. A clean crossing after one careful drag is a complete run with no hidden detour.
By following these steps in sequence, you can finish Tricky Castle Level 12 without relying on random movement or unnecessary interactions. Remember that the defining puzzle in Tricky Castle Level 12 is to drag the overhead platform down to build a bridge. If your room looks different, compare the screenshot and video before retrying because your game version may use another level number.
Tricky Castle Level 12 walkthrough video
Tricky Castle Level 12 walkthrough by PRAMONEZ LOMBOK. The video opens directly on this level.
Tricky Castle Level 12 video walkthrough and solution
This Tricky Castle Level 12 walkthrough video shows the complete verified route from the opening position to the exit. Watch how the player handles the room’s main trick—drag the overhead platform down to build a bridge—then use the written checkpoints below if you need to repeat only one part of the solution. The dedicated Tricky Castle Level 12 video solution is especially useful for jump timing, moving hazards and interactions that are easier to recognize in motion.
Tricky Castle Level 12 video quick answer: Touch the long platform above the spikes and drag it down into the gap, creating a safe bridge that the knight can walk across.
What to watch for in the Tricky Castle Level 12 walkthrough video
Before copying the movement, compare the room layout in the video with your game. Tricky Castle numbering can differ between Android and iOS builds, so the visual arrangement and puzzle clue are more reliable than the number alone. When the room matches, play the Tricky Castle Level 12 walkthrough video once at normal speed to understand the full idea, then replay the exact action that is causing trouble.
Video checkpoint 1: Ignore the impossible jump
At this point in the Tricky Castle Level 12 video walkthrough, stop at the left ledge and inspect the entire room before moving. The spike-filled gap is too wide to clear and the hazards below rule out a normal drop. The clue says that you can build the bridge yourself, directing attention to the long dark platform suspended above the center of the room. Watch the character, nearby hazards and any object that changes after the action; that visual response confirms that you can move to the next checkpoint.
Video checkpoint 2: Drag the platform into the gap
At this point in the Tricky Castle Level 12 video walkthrough, place a finger on the overhead platform and pull it downward. This object is controlled directly by touch rather than by the knight. Continue dragging until it sits horizontally between the two safe ledges and covers the route above the spikes. Release it only after both ends form a usable connection. Watch the character, nearby hazards and any object that changes after the action; that visual response confirms that you can move to the next checkpoint.
Video checkpoint 3: Walk across the new bridge
At this point in the Tricky Castle Level 12 video walkthrough, return to the movement controls and guide the knight onto the lowered platform. Cross at a steady pace without jumping into the spikes above or below, then step onto the right ledge and enter the exit. If the edge is not reachable, reposition the platform rather than attempting a longer jump. Watch the character, nearby hazards and any object that changes after the action; that visual response confirms that you can move to the next checkpoint.
Tricky Castle Level 12 video notes and precautions
The video route is a demonstration of one clean completion, not a signal to rush. Pause before any precise jump or timed interaction and compare the player’s starting position with yours. In Tricky Castle Level 12, a small difference in spacing can change when a trap activates.
- 1. The suspended platform can be moved directly with a finger.
- 2. A normal jump cannot safely clear the full spike gap.
- 3. Place the bridge level with both ledges before releasing it.
- 4. The room has no bats, so there is no reason to explore the hazard pit.
Tips for following the Tricky Castle Level 12 video solution
- 1. Start the drag near the center of the platform for stable control.
- 2. Move the platform slowly so it remains horizontal.
- 3. Check both bridge ends before switching back to movement controls.
- 4. Walk rather than jump once the bridge is correctly placed.
Collectibles shown around Tricky Castle Level 12
After learning the escape route from the Tricky Castle Level 12 walkthrough video, replay the room for optional items if needed. there are no bats in this level. Lowering the platform and reaching the right-hand exit completes every required objective. Because the bridge is the only movable object, you can ignore the decorative spikes and background elements once the platform is aligned. A clean crossing after one careful drag is a complete run with no hidden detour. A separate collectible run is often safer than trying to combine every secret with the first successful exit.
Finish Tricky Castle Level 12 with the video
The important lesson in this Tricky Castle Level 12 video guide is to reproduce the order of actions, not merely the final movement. Confirm each switch, platform or hazard response before continuing. If your screen still does not match, return to the screenshot on the Cheats & Solution tab and locate the guide whose room layout matches your version.